各个环境搭建Elasticsearch-7.9.2多节点配置
Elasticsearch 是一个分布式、RESTful 风格的搜索和数据分析引擎,能够解决不断涌现出的各种用例。 作为 Elastic Stack 的核心,它集中存储您的数据,帮助您发现意料之中以及意料之外的情况,elasticsearch官方文档。
Elasticsearch核心概念
接近实时(NRT)
Elasticsearch是一个接近实时的搜索平台。这意味着,从索引一个文档直到这个文档能够被搜索到有一个轻微的延迟(通常是1秒)。
集群(cluster)
一个集群就是由一个或多个节点组织在一起,它们共同持有你整个的数据,并一起提供索引和搜索功能。一个集群由一个唯一的名字标识,这个名字默认就是“elasticsearch”。这个名字是重要的,因为一个节点只能通过指定某个集群的名字,来加入这个集群。在产品环境中显式地设定这个名字是一个好习惯,但是使用默认值来进行测试/开发也是不错的。
节点(node)
一个节点是你集群中的一个服务器,作为集群的一部分,它存储你的数据,参与集群的索引和搜索功能。和集群类似,一个节点也是由一个名字来标识的,默认情况下,这个名字是一个随机的漫威漫画角色的名字,这个名字会在启动的时候赋予节点。这个名字对于管理工作来说挺重要的,因为在这个管理过程中,你会去确定网络中的哪些服务器对应于Elasticsearch集群中的哪些节点。
一个节点可以通过配置集群名称的方式来加入一个指定的集群。默认情况下,每个节点都会被安排加入到一个叫做“elasticsearch”的集群中,这意味着,如果你在你的网络中启动了若干个节点,并假定它们能够相互发现彼此,它们将会自动地形成并加入到一个叫做“elasticsearch”的集群中。
在一个集群里,只要你想,可以拥有任意多个节点。而且,如果当前你的网络中没有运行任何Elasticsearch节点,这时启动一个节点,会默认创建并加入一个叫做“elasticsearch”的集群。
ElaticSearch 和 DB 的关系
在 Elasticsearch 中,文档归属于一种类型 type,而这些类型存在于索引 index 中,我们可以列一些简单的不同点,来类比传统关系型数据库:
1
2
Relational DB -> Databases -> Tables -> Rows -> Columns
Elasticsearch -> Indices -> Types -> Documents -> FieldsElasticsearch 集群可以包含多个索引 indices,每一个索引可以包含多个类型 types,每一个类型包含多个文档 documents,然后每个文档包含多个字段 Fields。而在 DB 中可以有多个数据库 Databases,每个库中可以有多张表 Tables,没个表中又包含多行Rows,每行包含多列Columns。
索引(index)
一个索引就是一个拥有几分相似特征的文档的集合。比如说,你可以有一个客户数据的索引,另一个产品目录的索引,还有一个订单数据的索引。一个索引由一个名字来标识(必须全部是小写字母的),并且当我们要对对应于这个索引中的文档进行索引、搜索、更新和删除的时候,都要使用到这个名字。索引类似于关系型数据库中Database的概念。在一个集群中,如果你想,可以定义任意多的索引。索引是含义相同属性的文档集合,是 ElasticSearch 的一个逻辑存储,可以理解为关系型数据库中的数据库,ElasticSearch 可以把索引数据存放到一台服务器上,也可以 sharding 后存到多台服务器上,每个索引有一个或多个分片,每个分片可以有多个副本。
类型(type)
需要注意的是,7.x后,已废除单个索引下多 Type 的支持,es删除了type,只允许存在一种type,不需要指定type的值,默认是_doc;
在一个索引中,你可以定义一种或多种类型。一个类型是你的索引的一个逻辑上的分类/分区,其语义完全由你来定。通常,会为具有一组共同字段的文档定义一个类型。比如说,我们假设你运营一个博客平台并且将你所有的数据存储到一个索引中。在这个索引中,你可以为用户数据定义一个类型,为博客数据定义另一个类型,当然,也可以为评论数据定义另一个类型。类型类似于关系型数据库中Table的概念。
文档(document)
一个文档是一个可被索引的基础信息单元。比如,你可以拥有某一个客户的文档,某一个产品的一个文档,当然,也可以拥有某个订单的一个文档。文档以JSON(Javascript Object Notation)格式来表示,而JSON是一个到处存在的互联网数据交互格式。
在一个index/type里面,只要你想,你可以存储任意多的文档。注意,尽管一个文档,物理上存在于一个索引之中,文档必须被索引/赋予一个索引的type。文档类似于关系型数据库中Record的概念。实际上一个文档除了用户定义的数据外,还包括_index、_type和_id字段。映射(mapping)
ElasticSearch 的 Mapping 非常类似于静态语言中的数据类型:声明一个变量为 int 类型的变量,以后这个变量都只能存储 int 类型的数据。同样的,一个 number 类型的 mapping 字段只能存储 number 类型的数据。同语言的数据类型相比,Mapping 还有一些其他的含义,Mapping 不仅告诉 ElasticSearch 一个 Field 中是什么类型的值, 它还告诉 ElasticSearch 如何索引数据以及数据是否能被搜索到。ElaticSearch 默认是动态创建索引和索引类型的 Mapping 的。这就相当于无需定义 Solr 中的 Schema,无需指定各个字段的索引规则就可以索引文件,很方便。但有时方便就代表着不灵活。比如,ElasticSearch 默认一个字段是要做分词的,但我们有时要搜索匹配整个字段却不行。如有统计工作要记录每个城市出现的次数。对于 name 字段,若记录 new york 文本,ElasticSearch 可能会把它拆分成 new 和 york 这两个词,分别计算这个两个单词的次数,而不是我们期望的 new york。
分片和复制(shards & replicas)
一个索引可以存储超出单个结点硬件限制的大量数据。比如,一个具有10亿文档的索引占据1TB的磁盘空间,而任一节点都没有这样大的磁盘空间;或者单个节点处理搜索请求,响应太慢。Elasticsearch提供了将索引划分成多份的能力,这些份就叫做分片。当你创建一个索引的时候,你可以指定你想要的分片的数量。每个分片本身也是一个功能完善并且独立的“索引”,这个“索引”可以被放置到集群中的任何节点上。
Elasticsearch7.X重大改进
彻底废弃多type支持,包括api层面,之前版本可在一个索引库下创建多个type。
彻底废弃_all字段支持,为提升性能默认不再支持全文检索,即7.0之后版本进行该项配置会报错。
新增应用程序主动监测功能,搭配对应的kibana版本,用户可监测应用服务的健康状态,并在出现问题后及时发出通知。
取消query结果中hits count的支持(聚合查询除外),使得查询性能大幅提升(3x-7x faster)。这意味着,每次查询后将不能得到精确的结果集数量。
新增intervals query ,用户可设置多字符串在文档中出现的先后顺序进行检索。
新增script_core ,通过此操作用户可以精确控制返回结果的score分值。
优化集群协调子系统,缩减配置项提升稳定性。
新增 alias、date_nanos、features、vector等数据类型。
7.0自带java环境,所以我们在安装es时不再需要单独下载和配置java_home。
7.0将不会再有OOM的情况,JVM引入了新的circuit breaker(熔断)机制,当查询或聚合的数据量超出单机处理的最大内存限制时会被截断,并抛出异常(有点类似clickhouse)。
丰富多彩的kibana功能。
Windows安装Elasticsearch
windows下载ElasticSearch
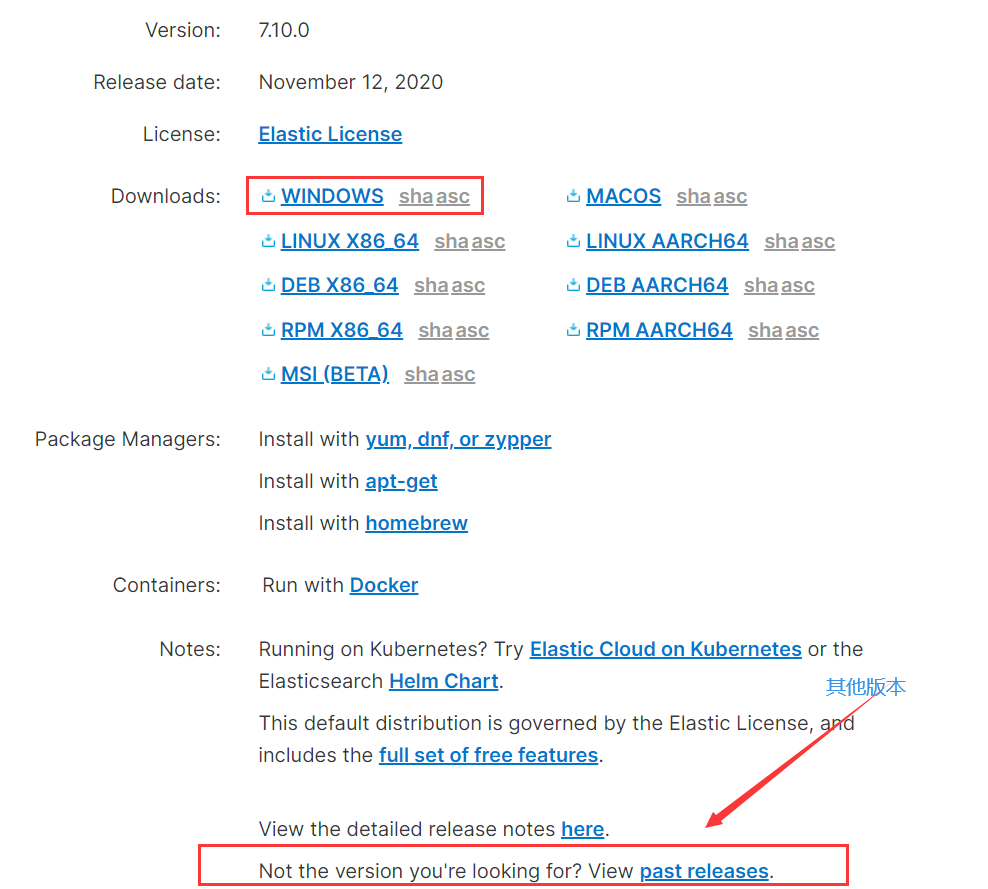
官网下载地址,目前最新版本为7.10.0
安装,目录结构
bin :脚本文件,包括 ES 启动 & 安装插件等等;
config : elasticsearch.yml(ES 配置文件)、jvm.options(JVM 配置文件)、日志配置文件等等;
JDK : 内置的 JDK,JAVA_VERSION=”12.0.1”;
lib : 类库;
logs : 日志文件;
modules : ES 所有模块,包括 X-pack 等;
plugins : ES 已经安装的插件。默认没有插件;
data : ES 启动的时候,会有该目录,用来存储文档数据。该目录可以设置
ES 默认安装后设置的堆内存是 1 GB,推荐:如果足够的内存,也尽量不要 超过 32 GB。即每个节点内存分配不超过 32 GB。 因为它浪费了内存,降低了 CPU 的性能,还要让 GC 应对大内存。如果你想保证其安全可靠,设置堆内存为 31 GB 是一个安全的选择。
配置说明:
1
2
3
4
5
6
7
8
9
10
11
12
13
14
15
16
17
18
19
20
21
22
cluster.name 集群名称,相同名称为一个集群
node.name 节点名称,集群模式下每个节点名称唯一
node.master 当前节点是否可以被选举为master节点,是:true、否:false
node.data 当前节点是否用于存储数据,是:true、否:false
path.data 索引数据存放的位置
path.logs 日志文件存放的位置
bootstrap.memory_lock 需求锁住物理内存,是:true、否:false
bootstrap.system_call_filter SecComp检测,是:true、否:false
network.host 监听地址,用于访问该es
network.publish_host 可设置成内网ip,用于集群内各机器间通信
http.port es对外提供的http端口,默认 9200
discovery.seed_hosts es7.x 之后新增的配置,写入候选主节点的设备地址,在开启服务后可以被选为主节点
cluster.initial_master_nodes es7.x 之后新增的配置,初始化一个新的集群时需要此配置来选举master
http.cors.enabled 是否支持跨域,是:true,在使用head插件时需要此配置
http.cors.allow-origin "*" 表示支持所有域名
我们要只需要在之前的基础上,打开配置文件elasticsearch.yml,添加如下三个配置:
cluster.name: my-es #集群名称
node.name: node-master #主节点名称
node.master: true #当前节点是否可以被选举为master节点,是:true、否:false
discovery.seed_hosts: ["192.168.43.96", "192.168.43.96", "192.168.43.96"]#写入候选主节点的设备地址,在开启服务后可以被选为主节点
cluster.initial_master_nodes: ["node-1"] #初始化一个新的集群时需要此配置来选举master安装之后,启动bin目录下的
elasticsearch.bat,浏览器输入http://localhost:9200/可以看到1
2
3
4
5
6
7
8
9
10
11
12
13
14
15
16
17{
"name": "DESKTOP-OTFETG1",
"cluster_name": "my-application",
"cluster_uuid": "Spia1nK7RLuV9UsecsZ29w",
"version": {
"number": "7.9.2",
"build_flavor": "default",
"build_type": "zip",
"build_hash": "d34da0ea4a966c4e49417f2da2f244e3e97b4e6e",
"build_date": "2020-09-23T00:45:33.626720Z",
"build_snapshot": false,
"lucene_version": "8.6.2",
"minimum_wire_compatibility_version": "6.8.0",
"minimum_index_compatibility_version": "6.0.0-beta1"
},
"tagline": "You Know, for Search"
}其中:
- name : 默认启动的时候指定了 ES 实例名称,name 为 BYSocketdeMacBook-Pro-2.local
- cluster_name : 默认名为 elasticsearch
- version :版本信息
也可以通过
http://localhost:9200/_cat/nodes?v地址,可以看到当前节点信息:1
2ip heap.percent ram.percent cpu load_1m load_5m load_15m node.role master name
127.0.0.1 57 59 12 dilmrt * DESKTOP-OTFETG1如果是多节点,其中节点一配置为:
1
2
3
4
5
6
7
8
9
10
11
12
13
14
15
16
17
18
19
20
21
22
23
24
25
26
27
28
29
30
31
32
33
34
35
36
37
38
39# 设置集群名称,集群内所有节点的名称必须一致。
cluster.name: my-application
# 设置节点名称,集群内节点名称必须唯一。
node.name: node-1
# 表示该节点会不会作为主节点,true表示会;false表示不会
node.master: true
# 当前节点是否用于存储数据,是:true、否:false
# node.data: true
# 索引数据存放的位置
#path.data: /opt/elasticsearch/data
# 日志文件存放的位置
#path.logs: /opt/elasticsearch/logs
# 需求锁住物理内存,是:true、否:false
#bootstrap.memory_lock: true
# 监听地址,用于访问该es
# network.host: 127.0.0.1
# es对外提供的http端口,默认 9200
http.port: 9200
# TCP的默认监听端口,默认 9300
# transport.tcp.port: 9300
# 设置这个参数来保证集群中的节点可以知道其它N个有master资格的节点。默认为1,对于大的集群来说,可以设置大一点的值(2-4)
# discovery.zen.minimum_master_nodes: 2
# es7.x 之后新增的配置,写入候选主节点的设备地址,在开启服务后可以被选为主节点
discovery.seed_hosts: ["127.0.0.1:9300", "127.0.0.1:9301"]
# discovery.zen.fd.ping_timeout: 1m
# discovery.zen.fd.ping_retries: 5
# es7.x 之后新增的配置,初始化一个新的集群时需要此配置来选举master
cluster.initial_master_nodes: ["node-1", "node-2"]
# 是否支持跨域,是:true,在使用head插件时需要此配置
http.cors.enabled: true
# “*” 表示支持所有域名
http.cors.allow-origin: "*"
# action.destructive_requires_name: true
# action.auto_create_index: .security,.monitoring*,.watches,.triggered_watches,.watcher-history*
# xpack.security.enabled: false
# xpack.monitoring.enabled: true
# xpack.graph.enabled: false
# xpack.watcher.enabled: false
# xpack.ml.enabled: false节点二配置:
1
2
3
4
5
6
7
8
9
10
11
12
13
14
15
16
17
18
19
20
21
22
23
24
25
26
27
28
29
30
31
32
33
34
35
36
37
38
39# 设置集群名称,集群内所有节点的名称必须一致。
cluster.name: my-application
# 设置节点名称,集群内节点名称必须唯一。
node.name: node-2
# 表示该节点会不会作为主节点,true表示会;false表示不会
node.master: true
# 当前节点是否用于存储数据,是:true、否:false
# node.data: true
# 索引数据存放的位置
#path.data: /opt/elasticsearch/data
# 日志文件存放的位置
#path.logs: /opt/elasticsearch/logs
# 需求锁住物理内存,是:true、否:false
#bootstrap.memory_lock: true
# 监听地址,用于访问该es
# network.host: 127.0.0.1
# es对外提供的http端口,默认 9200
http.port: 9201
# TCP的默认监听端口,默认 9300
# transport.tcp.port: 9301
# 设置这个参数来保证集群中的节点可以知道其它N个有master资格的节点。默认为1,对于大的集群来说,可以设置大一点的值(2-4)
# discovery.zen.minimum_master_nodes: 2
# es7.x 之后新增的配置,写入候选主节点的设备地址,在开启服务后可以被选为主节点
# discovery.seed_hosts: ["127.0.0.1:9300", "127.0.0.1:9301"]
# discovery.zen.fd.ping_timeout: 1m
# discovery.zen.fd.ping_retries: 5
# es7.x 之后新增的配置,初始化一个新的集群时需要此配置来选举master
cluster.initial_master_nodes: ["node-1", "node-2"]
# 是否支持跨域,是:true,在使用head插件时需要此配置
http.cors.enabled: true
# “*” 表示支持所有域名
http.cors.allow-origin: "*"
# action.destructive_requires_name: true
# action.auto_create_index: .security,.monitoring*,.watches,.triggered_watches,.watcher-history*
# xpack.security.enabled: false
# xpack.monitoring.enabled: true
# xpack.graph.enabled: false
# xpack.watcher.enabled: false
# xpack.ml.enabled: falseCentOS安装Elasticsearch
yum源方式
创建文件夹
1
mkdir /opt/elasticsearch
在/opt/elasticsearch下载
1
wget https://mirrors.tuna.tsinghua.edu.cn/elasticstack/7.x/yum/7.9.2/elasticsearch-7.9.2-x86_64.rpm
安装elasticsearch
1
rpm -ivh elasticsearch-7.9.2-x86_64.rpm
安装包方式
同windows,下载LINUX X86_64版本
下载之后,解压
1
tar -zxvf elasticsearch-7.9.2-linux-x86_64.tar.gz
配置elasticsearch
编辑elasticsearch.yml
1
2cd /opt/elasticsearch/config
vim elasticsearch.yml配置文件如下:
1
2
3
4
5
6
7
8
9
10
11
12
13
14
15
16
17
18
19
20
21
22
23
24
25
26
27
28
29
30
31
32
33
34
35
36
37
38
39
40
41
42
43
44
45
46
47
48
49
50
51
52
53
54
55
56
57
58
59
60
61
62
63
64
65
66
67
68
69
70
71
72
73
74
75
76
77
78
79
80
81
82
83
84
85
86
87
88
89
90
91
92# ======================== Elasticsearch Configuration =========================
#
# NOTE: Elasticsearch comes with reasonable defaults for most settings.
# Before you set out to tweak and tune the configuration, make sure you
# understand what are you trying to accomplish and the consequences.
#
# The primary way of configuring a node is via this file. This template lists
# the most important settings you may want to configure for a production cluster.
#
# Please consult the documentation for further information on configuration options:
# https://www.elastic.co/guide/en/elasticsearch/reference/index.html
#
# ---------------------------------- Cluster -----------------------------------
#
# Use a descriptive name for your cluster:
#
cluster.name: my-application
#
# ------------------------------------ Node ------------------------------------
#
# Use a descriptive name for the node:
#
node.name: node-1
#
# Add custom attributes to the node:
#
#node.attr.rack: r1
#
# ----------------------------------- Paths ------------------------------------
#
# Path to directory where to store the data (separate multiple locations by comma):
#
path.data: /opt/elasticsearch/elasticsearch-7.9.2/data
#
# Path to log files:
#
path.logs: /opt/elasticsearch/elasticsearch-7.9.2/logs
#
# ----------------------------------- Memory -----------------------------------
#
# Lock the memory on startup:
#
#bootstrap.memory_lock: true
#
# Make sure that the heap size is set to about half the memory available
# on the system and that the owner of the process is allowed to use this
# limit.
#
# Elasticsearch performs poorly when the system is swapping the memory.
#
# ---------------------------------- Network -----------------------------------
#
# Set the bind address to a specific IP (IPv4 or IPv6):
# 可以直接填ip
network.host: 0.0.0.0
#
# Set a custom port for HTTP:
#
http.port: 9200
#
# For more information, consult the network module documentation.
#
# --------------------------------- Discovery ----------------------------------
#
# Pass an initial list of hosts to perform discovery when this node is started:
# The default list of hosts is ["127.0.0.1", "[::1]"]
#
discovery.seed_hosts: ["xxx.xxx.xxx.xxx:9300","xxx.xxx.xxx.xxx:9301","xxx.xxx.xxx.xxx:9302"]
#
# Bootstrap the cluster using an initial set of master-eligible nodes:
# 写一个即可,作为master
cluster.initial_master_nodes: ["node-1","node-2","node-3"]
#
# For more information, consult the discovery and cluster formation module documentation.
#
# ---------------------------------- Gateway -----------------------------------
#
# Block initial recovery after a full cluster restart until N nodes are started:
#
#gateway.recover_after_nodes: 3
#
# For more information, consult the gateway module documentation.
#
# ---------------------------------- Various -----------------------------------
#
# Require explicit names when deleting indices:
#
#action.destructive_requires_name: true
http.cors.enabled: true
http.cors.allow-origin: "*"
bootstrap.memory_lock: false
bootstrap.system_call_filter: false
报错原因分析:
Caused by: java.lang.RuntimeException: can not run elasticsearch as root
1
2
3
4adduser es
passwd es
chown -R es:es elasticsearch-7.9.2/
chmod 770 elasticsearch-7.9.2/max file descriptors [4096] for elasticsearch process is too low, increase to at least [65535]
每个进程最大同时打开文件数太小,可通过下面2个命令查看当前数量
1
2ulimit -Hn
ulimit -Sn1
2
3
4vim /etc/security/limits.conf
末尾追加
* soft nofile 65536
* hard nofile 65536max number of threads [3818] for user [es] is too low, increase to at least [4096]
最大线程个数太低。可通过下面2个命令查看当前数量
1
2ulimit -Hu
ulimit -Su1
2
3
4vim /etc/security/limits.conf
末尾追加
* soft nproc 4096
* hard nproc 4096max virtual memory areas vm.max_map_count [65530] is too low, increase to at least [262144]
1
2
3
4vi /etc/sysctl.conf
增加 vm.max_map_count=262144
#执行命令生效
sysctl -p
可能用到命令
1
2
3
4# 查找ES进程号
ps -ef | grep elastic
# 杀掉ES进程
kill -9 3250
检查集群是否成功:http://192.168.12.136:9200/_cat/health?v
Elasticsearch设置开机启动
查看当前的开机启动服务
1 | chkconfig --list |
手动启动没有问题,且外网可以访问正常;
外网若访问不了
1 | firewall-cmd --zone=public --add-port=9200/tcp --permanent |
在/etc/init.d/目录创建es文件
1 | vim /etc/init.d/es |
1 | !/bin/sh |
注:
ES_HOME: elasticsearch所在目录
su - es -c “$ES_HOME/bin/elasticsearch -d -p pid” 中使用自己的用户名
修改上面文件的权限,执行命令
1 | chmod 777 /etc/init.d/es |
添加和删除服务并设置启动方式
1 | chkconfig --add es |
启动和关闭服务
1 | service es start // 启动服务 |
设置服务的启动方式
1 | chkconfig es on // 设置开机启动 |
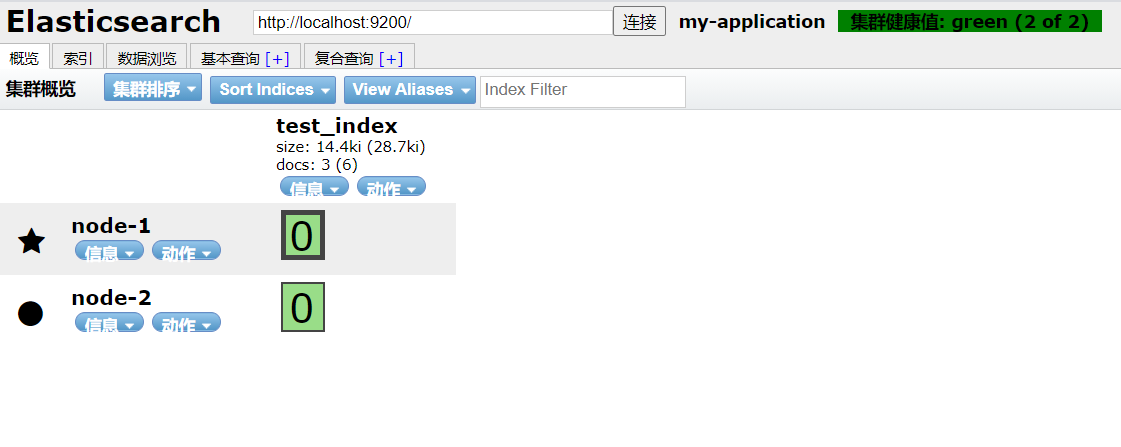
ElasticSearch Head 使用
浏览器安装插件ElasticSearch Head即可使用